Why should you do this?
Here’s some context on what personally lead me to make this decision and switch from an old Gmail account to my current provider (Proton Mail) with a custom domain.
If you want to skip ahead to the guide (i.e: you already made the decision to switch and only want to know how), you can go to the next section.
The problem with email
Today, most would say that email is an integral part of our lives, and can be considered an essential service. This space is largely controlled by a few major service providers such as Gmail (from Google) and Outlook (from Microsoft).
Using a major provider has great points for convenience and monetary costs (i.e: none) as well as no management requirements. However, as it usually goes for using any service on the internet, accounts on these platforms are at risk of being deactivated for any number of reasons, even from non-intentional reasons such as accidents from the providers themselves.
Usually, losing an account is not the end of the world, but email is so central to all of our digital lives that losing access can spell disaster on the affected users. Not to mention that we also depend on domain names given by the service provider (name@gmail.com, name@outlook.com, etc.), which means that if the account is closed for any reason, it can be hard to recoup the loss and change our address on all services that uses it (unless you have all services documented somewhere, like in a password manager).
There have been stories about arbitrary account closures, especially from Google, who’s support service seems spotty at best. Here’s an example: When Google locks you out of your account, begging the internet for help is your first (and last) resort.
There is also an argument to be made about the privacy aspect of storing email with companies known to collect data about their users to sell to third parties, but I will focus more on the reliability prospects within this article.
What can we do?
Taking into accounts the above risks, measures can be taken to take control of our email such as using our own domain name and making regular backups. That way, no matter what provider you use, even if your account is lost for any reason, you can switch to another provider without too much hassle.
On the subject of switching providers, this article will also cover this aspect. If you were using Google or Microsoft as your email provider, this can result in better privacy for your personal data. Since email contains sensitive information, you have to make sure that you pick a provider you trust before making this move.
This is a personal decision, but in my case, mainly for the reliability risks outlined in multiple stories about Gmail, I made the move to Proton Mail in summer 2021, and have been a satisfied user ever since. This article will be mainly focusing on Proton Mail as an alternative provider, but there are others you may consider as well, as long as they support custom domains.
Note that there are recurring costs involved in this move. Your mileage may vary, but for illustrating a specific scenario: at the time of writing this article, a setup with Proton Mail Plus would cost $48 USD + $14 USD for the domain I use. This makes a total of $62 USD per year for this setup.
With the context and reasoning out of the way, let’s go ahead and make the move!
Step 1 - Choosing a domain name and provider
Picking our domain is a very important decision that is worth thinking about carefully since, as with our old email address, if we wish to switch domains again, it will take a lot of work to change our emails on all the websites we use. There’s also the cost aspect, a domain can have a wide range of cost per year, and you are essentially tied to this domain from the moment you use it for email.
First, let’s check which domains are available to us on a domain provider. I would recommend using either Porkbun or Namecheap.
If you are signing up for the first time on a domain provider, make sure to set up MFA (Multi-Factor Authentication) on your account as well as a unique password. The reason why is that if the account is not secured properly, it can potentially be breached and the attacker will then have the capacity to forward all email destined to your domain to an account they own.
Treat your domain provider that controls your email domain as a critical account to protect.
For choosing a domain name, I recommend using an inexpensive domain name that remains easy to spell/remember and family-friendly (one that you would be OK with showing to anyone, including your employer). There are also specific requirements on some top-level domains (example.com, example.ca, etc.), so make sure to pay attention to them if applicable.
Once you have decided which domain to use and purchased it, we can proceed to the next step.
Make sure that auto-renew is on for the domain you’ll use for email. You do not want your domain to expire and become unable to receive/send email by surprise. Always keep your payment info up to date on the domain provider as well to avoid this scenario.
Step 2 - Choosing an email provider
The only alternative provider I personally used and can vouch for is Proton Mail.
Here are a few reasons why I chose Proton Mail:
- Founded by scientists who met at CERN
- Strong community trust of the service
- Based in Switzerland, where user data is protected by strong privacy laws
- Known for great reliability/performance
- Quality mobile app available for both iOS and Android
- Externally audited by Securitium
- Reasonable pricing model
- A good amount of options to organize mailboxes (filters, labels, folders, spam filter, etc.)
- Bridge app to allow for usage with desktop clients (and offline use)
The choice of a provider entirely depends on your threat model, so I would recommend making additional research if you feel that your threat model is higher than average.
If you want to try another provider than Proton Mail, you can try one mentioned in the listings provided by Privacy Guides and Privacy Tools.
With whichever choice you pick, verify that the provider supports custom domains.
The rest of this guide will be focused on Proton Mail, but there should be documentation on whichever provider you choose to do the same steps that are being done for the rest of the guide.
Step 3 - Setting up your email address with your custom domain
Let’s now set up our custom domain on Proton Mail. Make sure you have chosen an email address before proceeding (e.g.: gabriel@example.com). Since it’s your domain, you can pick anything you want, but make sure it is an address that you are OK with being tied to for a potentially very long time, and one that you could show to anyone without issue.
The setup is largely about setting up DNS on your domain name provider to use Proton Mail (MX records) as well as setting up email security with SPF, DKIM and DMARC. In short:
- MX records allows for routing email to Proton’s mail servers.
- SPF specifies which sources are allowed to deliver email on behalf on a domain.
- DKIM cryptographically signs an email and protects it from modification in transit.
- DMARC allows for management of emails that are non-compliant with both SPF and DKIM. Policies can be set for how to manage these emails on the receiving side (
quarantine,reject, ornone). A general recommendation is to start at a policy ofp=noneand then monitor with a DMARC monitoring service like https://www.uriports.com/dmarc (one month free trial) and if satisfactory (no emails flagged unintentionally as DMARC failures), work up top=quarantineand then, if wanted, you can go withp=reject. If unsure, usenoneto start with. - You can have only have 1 SPF record and 1 DMARC record. You can, however, have multiple DKIM records (and Proton Mail should give multiple ones during setup).
For more info on SPF, DKIM and DMARC: Introduction to SPF, DKIM, and DMARC
Now that we know more about what we are putting in place, I recommend following Proton’s setup guide to put your custom domain in place for your email. Here is a link: How to use a custom domain with Proton Mail.
Depending on which domain provider you used, you will have to set up DNS records on their respective dashboards. Here’s documentation on how to set them up on Porkbun and Namecheap:
- Porkbun
- Namecheap (This documentation is for A records, but the same general procedure applies to other record types like MX, CNAME and TXT)
Other useful resources for DMARC
If you want to know more about DMARC, here’s a few useful links:
- DMARC Tester - Tests for validity of emails sent from your domain for DMARC. In other words, if you send an email there and it passes the DMARC test, your emails should not be sent to junk mail or dropped from the receiving servers (like Outlook or Gmail).
- Reddit thread talking about DMARC for Proton Mail
- DMARC Monitoring Service - One month free trial, which should be enough to determine if graduating from
p=nonetop=quarantineorp=rejectis a good idea for your setup.
Step 4 - Transferring emails to the new provider
I personally did not transfer my emails since I preferred to start from scratch. I made a backup of the old email box just in case and set up the old account to forward all new emails to the Proton Mail box (see the next section for setting up forwarding).
My recommendation would be to first make a backup of all data from your current provider in case anything wrong happens during the switch:
- Gmail
- Outlook (Note: exporting data only seems to be supported on the desktop app of Outlook, which is available on Windows and macOS only)
Once done, proceed with the Easy Switch application made by Proton Mail and follow the steps for your current email provider. Here is the documentation from Proton: https://proton.me/support/easy-switch-emails
Step 5 - Forwarding emails to the new provider
Once your data has been transferred to Proton Mail and your new address with your domain is set up, we are ready to use this shiny new email account! ✉️
Now comes the part which will take longer and likely be done gradually over time - changing the email address on all our current online accounts. To make this a bit easier, we’ll configure email forwarding from our old provider to our new account and automatically label each incoming email from the old account. This will make it so that we can easily spot which accounts still use the old email provider, and also allow us to have copies of all new emails in Proton Mail, wether they are received from our old email address or our new one.
Filter for forwarded mail
First, let’s create a label for our old address and configure a filter in Proton Mail that will automatically attach it to incoming email from the old address. This will make it easy for us to identify emails from the old provider.
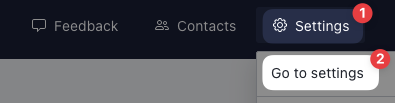
Log in to Proton Mail
From the top right, head to the Proton Mail settings
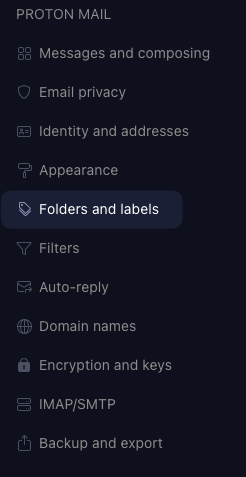
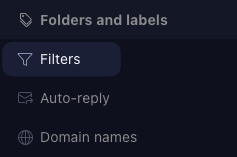
Head to “Folders and labels” in the menu on the left
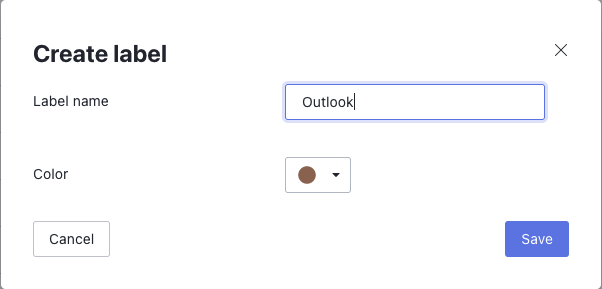
Under “Labels”, click on “Add label”
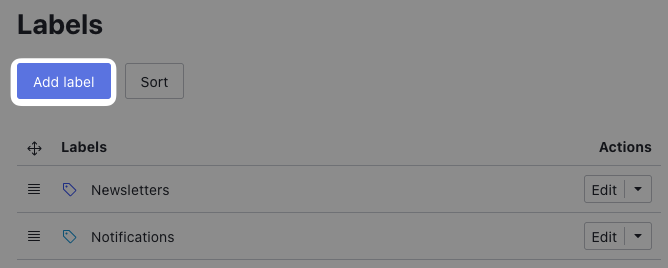
Name the label in a way that you will recognize that it’s your old address. In my case, I used the provider’s name. Choose a color of your liking and click “Save”.
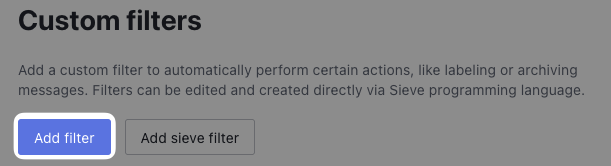
Now that we have our label, let’s set up our filter. Go to the menu on the left and click on “Filters”
Click on “Add filter”
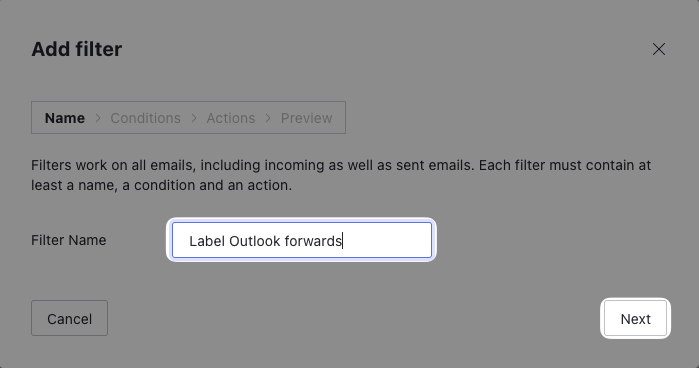
Choose a descriptive filter name. It will be labeling emails forwarded from our old address, so in my case, I named it “Label PROVIDERNAME forwards”. Then, click on “Next”.
Set the statement to “ANY” (can technically be at “ALL” here since we only have one condition) and then, in the “IF” expression, set it to “The recipient”, “contains” and then enter the address of your old email account from which you’ll be forwarding from. Make sure to click on “Insert” so that we see the address in a rounded box (see screenshot), then, click “Next”
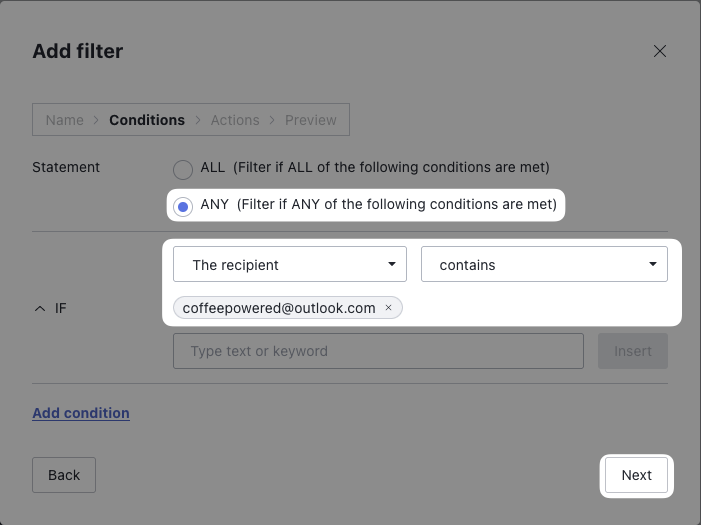 Full disclaimer: I do not own the email address in the screenshot, it is used only as an example
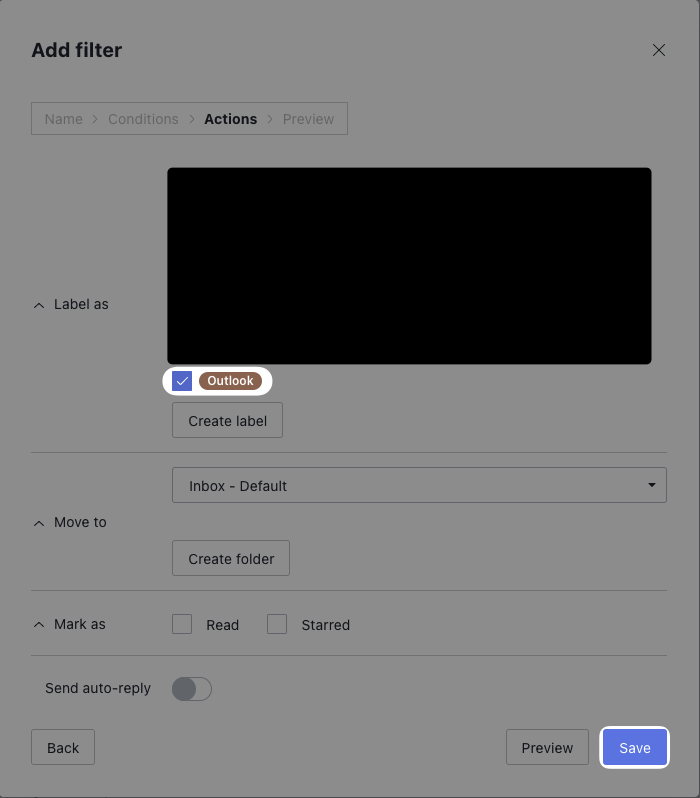
Check the label you created earlier, in this case, “Outlook”. If you wish to automatically move the forwarded emails to another folder than the Inbox, you can configure this in the “Move to” section. Once done, click on “Save”
Now that our filter is created, we are ready to receive email forwards from our old account. Let’s set that up!
Set up forwarding
This is a generally simple operation, depending on the provider. Here’s some documentation for Outlook and Gmail:
In my case, I also set up the forwarding to keep copies of the forwarded messages on the old account, but you can also choose to not keep them if you want, this is a matter of preference.
Once forwarding is done, you can test it by sending an email to your old account and check if you receive it in your Proton Mail inbox (with the label attached 🏷).
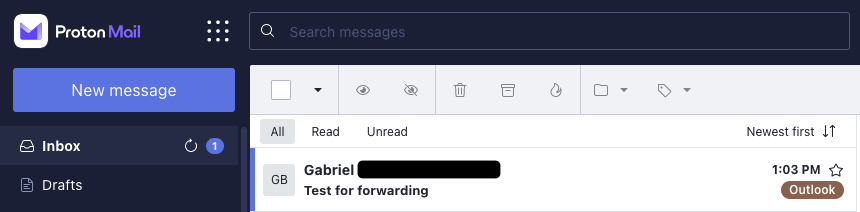 It works!
Step 6 - Changing email address on online accounts
Now, you should change your email address on your online accounts. My recommendation would be to go by priority, pick the services that matter the most to you first and then gradually move down the priority list.
This will most likely be a long term process, which is why the email forwarding will be very useful to catch the forgotten accounts along the way.
Here are account categories that you may want to look at first (as suggestions):
- Finance sites (banks, insurance, etc.)
- Shopping (Amazon, etc.)
- Cloud services (AWS, Azure, GCP, Linode, etc.)
- Social Media
- Newsletters
- Shipping services
- Mobile accounts (Apple/Google)
- Entertainment (Streaming, Gaming, etc.)
- Password managers
One thing that you may find useful as well is that Proton Mail supports ‘+’ aliases, which allows for creating as many addresses as you may want. This can be useful for having one email per website for example, or multiple accounts for one site that all lead to the same email address (extremely useful for AWS accounts in my personal experience). Note that this can cause issues on certain websites and that you cannot send emails as a + alias. It is personal preference if you want to use this feature or not. Here’s more information on it: https://proton.me/support/addresses-and-aliases
If you need aliases that are completely hidden from your main email (similar to temporary email addresses services), Proton also has a service for that with their recent acquisition of SimpleLogin and they allow the usage of this service using a Proton account.
After a certain amount of time, it may be time to do a backup of your emails. This will be the next and final step.
Step 7 - Backing up emails on the new provider
Proton Mail is a managed service and is responsible of making sure to not lose your data, but it never hurts to be too careful, so we will make backups just in case. Make sure to store your backup in a safe place that has encryption applied to it (since the emails themselves will be unencrypted once exported).
Here’s the guide from Proton on how to export your messages: https://proton.me/support/export-emails-import-export-app
Good potential backup destinations can be a external hard drive encrypted with VeraCrypt, on a machine with Bitlocker, Filevault or LUKS enabled, or on a NAS with disk encryption.
Extra - Email organization setup for Proton Mail
This is up to personal preference, but my general setup is the following:
- I label every message received (filters (AKA rules) helps a lot with this).
- Once read and labeled, I put the email in the Archive folder provided by Proton Mail.
- This allows me to keep a clean Inbox and I can refer to the labels at any time within the side panel to read old messages (like folders).
- If I want to see all my emails at once, I can go to the Archive itself.
- I also created dedicated folders for my emails that I do not want grouped together with the rest (like monitoring notifications or lab accounts).
- Unimportant messages that I don’t wish to keep get sent to the Trash (Proton Mail does not delete messages automatically within the Trash, so I empty it about every month or so manually).
Conclusion
Thank you for reading! I hope this guide helped out in your migration to your own domain and new provider that respects your privacy more. Don’t hesitate to contact me on Twitter (@CoffeePwrd) if you have any questions/comments/suggestions.
Also, if you found this article useful, please spread the word! This would mean a lot for me and my little blog. 😄